It’s simple to take better photos on your iPhone by activating grid lines in the Camera app. We will introduce how to finish it in this post.
Camera grid lines aid you in following the “Rule of Thirds” of the photography world. The great camera on the iPhone means you can easily take good pictures, but by turning on the camera grid you can use the rule of thirds to take great pictures every time! Never heard of that before? Wondering how to get grid on iPhone camera?
Well, read on to find out what the rule of thirds is and how you can enable iPhone camera grid lines to implement it.
Table of Contents
What is the iPhone Camera Grid?
Using four lines that run both horizontally and vertically across the screen, the camera grid feature divides the frame of your photos into eight equal sections.
When turned on, the screen is covered in nine squares. There is much more to it than just what appears to be an empty tic-tac-toe grid.
Your photographs can become much more visually striking by including objects in the intersections of those lines.
How to Get Camera Grid Lines on An iPhone?
You won’t find an option to enable camera grid lines in the Camera app; you’ll have to go to the Settings app instead:
- Open Settings and go to Camera.
- Under Composition, turn on the toggle for Grid.
- Open the Camera app to confirm if you can see the grid lines on your screen.
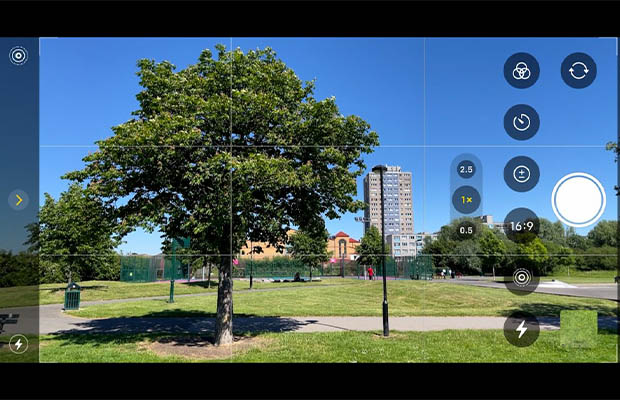
The Rule of Thirds can be easily applied because there are two horizontal and two vertical grid lines to create three columns and rows. Additionally, the grid lines are visible in every iPhone camera mode.
You May Also Like: How To Shoot A Music Video By Yourself On iPhone?
How To Use the iPhone Camera Grid Effectively?
Every time they open the camera app after the setting is enabled, users will see a 3 x 3 grid overlay above the viewfinder. This can help better frame photos, especially those with a person or other prominent subject in view. Make sure the subject is in the center of the frame to take the best possible photo.
If the subject is a person, it is typically best to make sure that the subject’s shoulders are parallel to the horizontal grid lines of the camera.
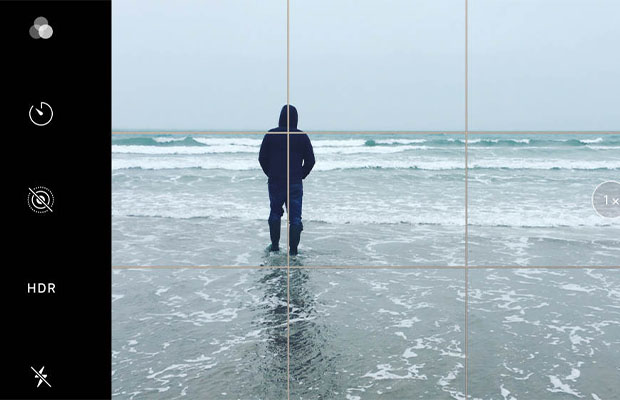
In addition, placing the subject’s head in the middle of the two vertical grid lines can enhance the visual appeal of the image. The iPhone’s camera grid can produce much better pictures with excellent framing with just a few quick steps.
Additionally, the camera app has software tools that can be used to enhance iPhone images automatically. The most popular one, Portrait Mode, determines the focus of a photo before it is taken. The background of the picture is blurred after the user clicks the shutter to draw attention to the picture’s main subject.
This is a component of the image’s post-processing, which includes all the computer optimization that takes place to a picture after it is taken. Even with Portrait Mode though, using the iPhone‘s camera grid alongside can result in a perfectly-framed shot.
Rule of Thirds on iPhone & Benefits of the Grid
Of course there are no hard-and-fast rules for anything. However, if you’re new to photography, becoming familiar with the rule of thirds may help you improve the composition and mood of your images.
- Nine squares of equal size make up the camera grid.
- The rule of thirds states that the important compositional elements or subjects should reside along the lines or at the intersections of the lines.
- The horizon line (of your photograph) must also coincide with either the top or bottom horizontal lines of the grid, according to the rule.
Advantages of Using Grid on iPhone Camera
Your iPhone device’s camera grid can improve your photos. The benefits of learning how to activate the grid on your iPhone camera are listed below.
Professionals Use This Technique
The “rule of thirds” is the foundation of the camera grid. This technique, which has been used in artwork since the 18th century, is known to skilled photographers.
Most painters and photographers automatically employ the “rule of thirds.” Amateur iPhone photographers may not see it as clearly. In this case, the camera gridlines are useful. Using the camera grid, anyone can take shots like a pro.
The idea behind the “rule of thirds” is to divide your scene into thirds using a 3 x 3 grid and align your subjects accordingly. Your pictures end up being much more intriguing as a result. Then all you need is a great iPhone filter. It really is that easy.
Level Your Photos Perfectly
By aligning objects with the lines on your screen, camera grids make it possible to take perfectly level photos. By perfectly aligning everything, you can prevent uneven and wonky photos. This merely means that you don’t have to rotate or angle your photos when editing.
Improve Your Landscape Photos
This camera grid is very useful for taking landscape photos because it shows where to place the horizon to get the best-looking photo. The horizon being perfectly in the middle of the picture is dull. That can be finished by anyone.

To ensure that the foreground focal points enhance your image and draw the viewer’s attention to the area, you can align them with the lines. The area of the image that most interests you should take up two thirds of the frame. Because of the grid, it is quite easy to arrange things that way.
Frame Your Photos Easily
When taking pictures with our phones, we frequently do so without thinking twice, placing the subject directly in the center of the frame. Because it is the entire focus of the image, the subject should be in the center.
Professional photographers dispute this claim. That strategy is not only dull and unoriginal, but it is also not the best way to present a subject. When the subject is lined up with lines on various sides of the screen in more subtly artistic ways using the camera grid, the subject is actually more prominently highlighted. This will allow you to get the most out of your photos. If you’re taking a portrait shot, make sure the subject’s eyes are in line with the grid because they usually serve as the picture’s focal point.
Improve Your Photo Composition
By highlighting various areas of your photos, the grid will enable you to clearly see the exact composition of the frame. You are forced to focus on the entire frame rather than just the subject.
By positioning objects of interest along the grid’s lines, you can make a picture much more balanced and use less negative space. The composition of the resulting image is a lot richer as a result.
More Likes for Your Photos
Given the abundance of photos on social media, you want to make sure your images are receiving a fair amount of attention. Using the camera grid is a tried-and-true method for doing this. If you start using it, you’ll already be one step ahead of many others.
Read More: How to Get Water Out of iPhone Camera?
FAQs
How to Turn Off Grid on iPhone Camera?
Simply go into your Settings App and scroll until you see your Camera app listed. Both may be listed as Photos and Camera on some iPhones. You’ll see a toggle button for the grid if you choose the option that directs you to the Camera app.
How to Get Grid on iPhone Camera iOS 15?
- Step 1. Launch Settings app
- Step 2. Tap on the Camera setting. [Hint: For old iOS device users tap on Photos & Camera tab.
- Step 3. Now Turn toggle Grid ON/Green.
How to Use Grid Lines in Camera?
Open the Settings app, choose “Photos & Camera” and turn on the “Grid” option. When you open your Camera app after doing so, you’ll notice that your screen has a faint grid pattern.
What Significance Can Be Underlined While Using the Rule of Thirds?
The advice to split your image into thirds using imaginary grid lines traveling both vertically and horizontally is known as the “rule of thirds.” As a general rule, place your most intriguing pieces where the grids converge.
Conclusion
You’ve got it now, then! You might have benefited in some ways from learning how to use the grid on your iPhone camera to get the perfect shot. Use the camera grid to your advantage, but try not to get too caught up in it. Not to direct you, but to help you, is its purpose.
The “rule of thirds” should be used as a general guideline rather than being strictly followed. It’s not necessary for the subjects to match the grid exactly; simply placing them close together might be sufficient.
We sincerely hope that you will find this article useful. If you want to know more information, read our posts below: