If you need to take some cool vintage pictures but don’t know how to put film in a camera, seems like you are at the right spot!
The new generation is simply accustomed to the new digital cameras, so they don’t really understand the positive feeling that the cameras with films brought to people years ago.
Whether you believe it or not, film cameras are still relevant in the professional photography industry and are considered to be the best cameras in the field.
You can see some of the simplest procedures for loading film into a camera in this article. Let’s get started! Don’t miss out on film cameras!
Table of Contents
5 Simple Steps to Put Film in a Camera
- 1. Open the Back of your Camera
- 2. Put the Film in
- 3. Secure the Tip of the Film
- 4. Loading Film: Coordinate the Film and Wind the Film
- 5. Close your Camera & Load Film
Let’s examine each step one by one.
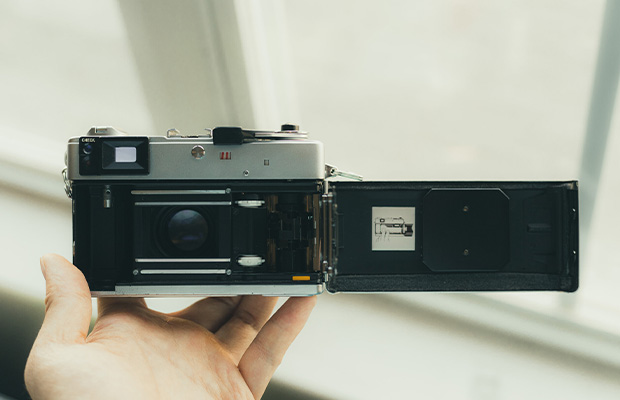
1. Open the Back of Your Camera
The first step is to open the camera’s back, but how do you do that? It is one of the simplest tasks, after all! You can easily release the latch on the back of your camera by pulling up the rewind knob, which is located on the upper part of the device.
Despite the fact that no two cameras are exactly alike, many of them use the same features to open the area where the film should be placed.
2. Put the Film In
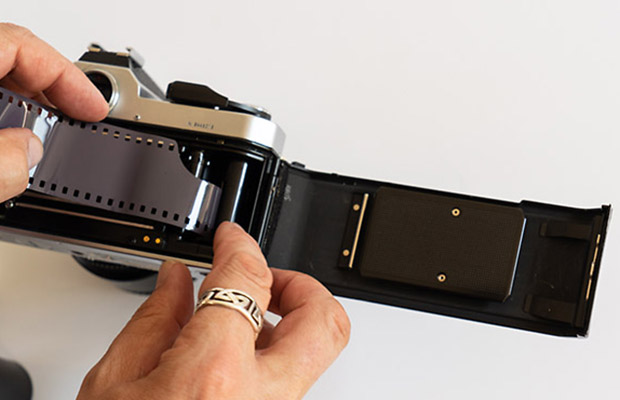
When your camera is opened, you will see two gaps on either side of the opening.
The film leader, also known as the roller, should be inserted on the left side. Pull up a small amount of the rewind knob I mentioned earlier in order to insert it. Pull it up, insert the film leader, and partially depress the rewind so the roller of the film can be held against the film chamber.
3. Secure the Tip of the Film
There is a spool and a notch on the right side of the device. Pull the film roller’s tip, and place it gently on the aforementioned film chamber while being as careful as you can to avoid leaving any fingerprints. Take up as much film as necessary to allow the notch pieces, which in this case appear to be clips, to capture the scene more effectively. Ensure that the film leader is pulled across the entire film guide before simply inserting it into the take up spool.
4. Loading Film: Coordinate the Film and Wind the Film
This step is just as simple as the first one I mentioned, so don’t be intimidated by the word coordination. The film advance lever, which is used to rotate the film inside the camera, is located on top of all cameras that accept film rollers. Once you notice that the toothed drums (the sprocket holes) line up with the holes in the camera, you have completed the coordination process. You can now load film, but don’t forget to lock the film canister. Simply pull the film advance lever to start the coordination process.
5. Close Your Camera & Load Film
The final step in loading film into a camera is to shut the device! Close the back, but pay attention to whether you hear a slight click to ensure that the film is firmly fastened and won’t come off. Rewind knob should be fully depressed.
In order to avoid using the exposed film that we used earlier, all you need to do right now is load film and make sure the picture counter’s number reads zero.
Read More: Can You Send A Snap From Camera Roll?
Film Photography Tips
Here are a few practical hints.
Use the Right Film
To get the best results, you must choose the right film for the available lighting. Use a faster film speed, such as an 800 ISO, if you’re shooting in low light. However, you can use a lower ISO film speed if there is plenty of natural light. 400 For daylong shooting, ISO is a good film.
Select the Correct Settings
Make certain that your camera is configured correctly before you begin shooting. Consider the best ISO, aperture, and shutter speed for the pictures you want to take. You’ll notice a noticeable improvement in your shots when you spend a few minutes getting your settings just right in the beginning!
Can You Load Film in the Light?
The leader should be the only exposed portion of the film, so you can load it in the light. In order to prevent too much light from entering while you switch films, the film cradle has felt around the edge. However, if at all possible, try to avoid loading your film in direct sunlight. To avoid the sun, simply move your body away from it or cover your camera with your hands.
Final Words on How to Put Film in a Camera
You are now more than prepared to pick up your camera and start shooting! I’m here to tell you that one of the most imaginative ways to take pictures is with film. Enjoy it while you use it!
Don’t forget to share this information on Facebook and Twitter if you found it useful. Visit the blog for more advice, reviews, and tutorials on photography.
You May Also Like: Why is My Camera Shaking?
FAQs
Can I Leave My Film Roll in the Camera?
Don’t keep film in your camera for longer than necessary; your film will go bad if not developed.
How Many Times Can You Use a Disposable Film Camera?
A disposable or single-use camera is a simple box camera meant to be used once. Most people use fixed-focus lenses.
Why Keep Film in the Fridge?
Storing it in the fridge will preserve the film for a lot longer than if it was left at room temperature.